Glass Chemically Strengthening Equipment

Overview

Standard

Introduction

This standard prescribes chemical strengthen glass term and definition, classification and sign, technical requirement, testing method, inspection ruler, packing, indicating, transportation and storage.

Quoted Documents

Below documents terms through this standard quoted become this standard's clause. Every quoted document which indicated date, its subsequent all amendment clause (Not included an error content in printing) or revised edition are not suitable for this standard.

  • GB/T 1216       External Diameter Micrometer
  • GB/T 5137.1 - 2002   Auto Safety Glass Testing Method (1st Section: Mechanics Test)
  • GB 11614 - 1999    Float Glass
  • GB/T 18144       Glass Stress Testing Method
  • JB/T 8788       Clearance Gauge

Terms & Definitions

Below terms and definitions are suitable for this standard.

Chemically Strengthened Glass is process through ion exchanged, alkali metal ions in the glass surface have been replaced by the other metal ion in molten salt, it will improve glass mechanical strength.

Chemically Strengthened Glass Classification

Chemically strengthened glass can be divided as per its purpose according to

  • Use for architecture: structure or room as separation action, sign is CSB
  • Besides architecture purpose: meter, optic meter, copier, family panel etc, sign is CSOB

Chemically strengthened glass can be divided into three kinds: Grade I, Grade II and Grade III as per its surface stress value.

Chemically strengthened glass can be divided into three kinds: Level A, Level B and Level C as per its compressive stress thickness.

Chemically Strengthened Glass Sign

Example 1: Architecture chemically strengthened glass with Grade II surface stress and Level B compressive stress layers. Its sign should be CSB-II-B.

Example 2: Besides architectural purpose chemically strengthened glass with Level A compressive stress layers. Its sign should be CSOB-A

General Principles

  • Stock size quality of chemically strengthened glass should be accord with relevant glass products standard requirement.
  • Technical requirement of chemically strengthened glass should be accord with Table 1 relevant clause prescribed

Table 1

Technical Requirement & Relevant Clause

Item Technical Requirement Testing Method
Architecture Besides Architecture
Thickness Tolerance 5.2 5.2 6.1
Size Tolerance 5.3 5.3 6.2
Diagonal Tolerance 5.4 5.4 6.3
Appearance Quality 5.5 5.5 6.4
Quality Of Processing Edge And Round Hole 5.6 5.6 6.5
Degree Of Curve 5.7 5.7 6.6
Bending Strength 5.8 - 6.7
Heating-Resistant 5.9 5.9 6.8
Surface Stress 5.1 - 6.9
Compressive Stress Layer Thickness 5.11 5.11 6.1
Shock Resistance - 5.12 6.11

Thickness Tolerance

Chemically strengthened glass thickness tolerance should be accord with Table 2 prescribed.

Table 2

Thickness Allowance Tolerance

Glass Thickness Allowance Tolerance
2, 3, 4, 5, 6 0.2
8, 10 0.3
12 0.4
Remarks: Glass thickness is less than 2mm and is more than 12mm thickness tolerance needed to be discussed by two parties.

Size Tolerance

For architecture purpose rectangle chemically strengthened glass, its length and width allowance tolerance should be accord with Table 3 prescribed. For the other shape and besides of architecture purpose chemically strengthened glass, its length and width size tolerance need to be discuss by two parties.

Table 3

Size Allowance Tolerance

Thickness Length (L)
(mm) L ≤ 1000 1000 < L ≤ 2000 2000 < L ≤ 3000 L > 3000
T<8 1
-2
3 3 4
T≥8 2
-3

Diagonal Tolerance

For rectangle chemically strengthened glass products, its rectangle tolerance value should be less than Table 4 prescribed.

Table 4

Rectangle Chemically Strengthened Glass Diagonal Tolerance Value

Glass Thickness Length (L)
(mm) L ≤ 2000 2000 < L ≤ 3000 L > 3000
3, 4, 5, 6 3 4 5
8, 10, 12 4 5 6
Remarks: Glass thickness is less than 2mm and is more than 12mm rectangle chemically strengthened glass diagonal tolerance need to be discussed by two parties.

Appearance Quality

Architecture purpose chemically strengthened glass appearance quality should be satisfy with Table 5 prescribed, besides architecture purpose chemically strengthened glass appearance quality need to be discussed by two parties.

Table 5

Chemically Strengthened Glass Appearance Quality

Disfigurement Name Description Allowance Disfigurement Amount
Break edge Every glass each meter edge allow length which is not more than 10mm, glass edge extend to glass surface depth is not more than 2mm, glass surface extend to glass thickness is less than one-third glass thickness. 1 place
Scuffing Light scratch width is less than 0.1mm, in each square meter how many it will allow to exist When L ≤ 60mm, allow 4 pieces to exist
Crack, unfilled corner Not allowed
Smutch ad spot Not allowed

Quality Of Processing Edge & Round Hole

Quality Of Processing Edge

Architecture purpose chemically strengthened glass edge should be process arries and fine grind. Besides architecture purpose chemically strengthened glass edge quality need to be discuss by two parties.

Quality Of Processing Round Hole Edge

Quality of processing round hole edge need to be discuss by two parties.

Architecture purpose chemically strengthened glass products round hole diameter allowance tolerance should be accord with Table 6 prescribed. This term is only suitable for glass which thickness is more than 4mm. Besides architecture purpose chemically strengthened glass round hole diameter allowance tolerance need to be discuss by two parties.

Table 6

Holes Diameter & Allowance Tolerance

Hole Diameter (Mm) Allowance Tolerance
D < 4 Need to be discuss by two parties
4 ≤ D ≤ 20 1
20 < D ≤ 100 2
D > 100 Need to be discuss by two parties

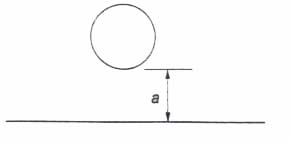
The distance from architecture purpose chemically strengthened glass products hole edge to glass edge:

  • This distance is not less two times than hole diameter D, it shows Figure 1.
    Figure-1-Of-Chemical-Strengthen-Glass-Testing-Standard.jpg
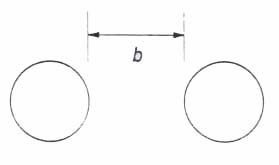
  • The distance b between two holes is not less two times than hole diameter D, it shows Figure 2.
    Figure-2-Of-Chemical-Strengthen-Glass-Testing-Standard.jpg
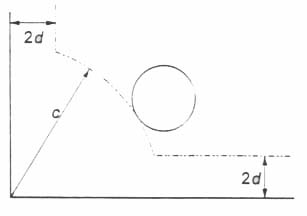
  • Distance c from hole edge to glass corner is not less six times than hole diameter D, it shows Figure 3.
    Figure-3-Of-Chemical-Strengthen-Glass-Testing-Standard.jpg
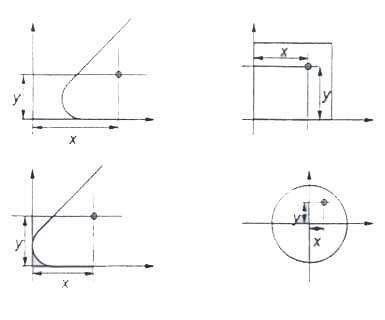
  • How to express the center place of hole can be refer to Figure 4, build coordinate system like Figure 4 showing, use center of hole coordinate (x, y) to express the center place of hole. Round hole center of circle place x, y allowance tolerance is the same with glass side length allowance tolerance (See Table 3). This term is only suitable for glass products which thickness is more than 4mm and glass hole is less than four pieces. Besides architecture purpose chemically strengthened glass edge quality need to be discuss by two parties.
    Figure-4-Of-Chemical-Strengthen-Glass-Testing-Standard.jpg

Degree Of Curve

Chemically strengthened glass degree of curve should be satisfied with Table 7 prescribed.

Table 7

Chemically Strengthened Glass Degree Of Curve

Glass Thickness D (Mm) Degree Of Curve
D ≥ 2 0.3%
Remarks: Chemically strengthened glass thickness less than 2mm degree of curve need to be discussed by two parties.

Bending Strength

The bending strength is measured by four points bending method. Because of 95% confidence interval, 5% disrepair probability, chemically strengthened glass bending strength is not less than 150Mpa. This clause is only suitable for above 2mm architecture purpose chemically strengthened glass.
Heat-Resistant

Chemically strengthened glass does not break if it is in 120 degree temperature difference.

Surface Stress

Chemically strengthened glass surface stress should be accord with Table 8 prescribed.

Table 8

Chemically Strengthened Glass Surface Stress

Classification Surface Stress P (Mpa)
I grade 300 < P ≤ 400
II grade 400 < P ≤ 600
III grade P > 600

Compressive Stress Layer Thickness

Chemically strengthened glass compressive stress layer thickness should be accord with Table 9 prescribed.

Table 9

Chemically Strengthened Glass Compressive Stress Layer Thickness

Classification Compressive Stress Layer Thickness D (μm)
A level 12 <D ≤ 25
B level 25 < D ≤ 50
C level D > 50

Shock Resistant

Chemically strengthened glass shock resistant should be accord with Table 10 prescribed.

Table 10

Chemically Strengthened Glass Shock Resistant

Glass Thickness D (Mm) Height Of Impact (M) State After Impacted
D < 2 1 Glass does not break
D ≥ 2 2

Measure Thickness

Using precision 0.01 mm outside diameter micrometer which suitable for GB/T 1216 prescribed or instrument that has the same precision with micrometer to measure thickness, measuring center of four edges within 15mm from glass edge, the result show in average of four center value, value has keep one decimal fraction.

Measure Size

Using 1 mm as min scale steel tapeline to measure size.

Diagonal Difference

Using 1 mm as min scale steel tapeline to measure size.

Appearance Quality

Inspection as per requirement of GB 11614-1999 item 5.3

Edge & Round Hole Processed Quality

Using 0.1mm as min scale Vernier Caliper to measure.

Measure Degree Of Curve

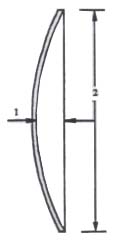
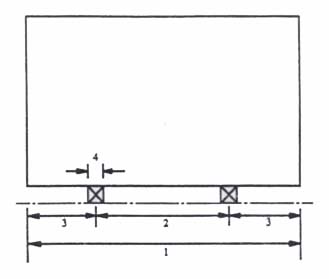
Please put glass under room temperature above 4 hours, when measure, let glass vertically stand, and put two pieces of pad under one-fourth long edge. Using straight ruler or wire tightly sticks two sides of sample or sample's diagonal direction, then adopting clearance gauge which satisfy JB/T 7979 to measure the space between straight line to glass, the percentage from height of arc comparing length of chord express degree of curve in bow, please see Figure 5 and Figure 6.

  • Arc Distortion
  • Chemically Strengthened Glass Length Or Diagonal Length

Figure 5

Chemically Strengthened Glass Arc Distortion Schematic Drawing

Figure-5-Of-Chemical-Strengthen-Glass-Testing-Standard.jpg
  • Length Or Width
  • One-Second Length Or Width
  • One-Fourth Length Or Width
  • Max. 100mm

Figure 6

Supporting Schematic Drawing Of Measuring Degree Of Curve

Figure-6-Of-Chemical-Strengthen-Glass-Testing-Standard.jpg

Bending Strength

The bending strength is measured by four point bending method. Testing as per Appendix A, furthermore, calculate bending strength.

Heat Shock

Put 300mm x 300mm glass sample into 120℃ + 2℃ oven, keep that temperature above 4 hours, after fetch out sample, and put sample vertically into 0℃ ice-water compound, it should be keep one-third to two-third of glass sample soak into water, after 5 min observe if glass sample break.

Take three pieces of glass samples to test, when these three pieces of glass are all accord with standard means this characteristic are qualified, if it has two or above two piece of glass are not accord with standard, it is unqualified. If it has one piece of glass is not qualified then need to fetch three new pieces of samples to test again, until three pieces of glass are all qualified.

Surface Stress

SAMPLE

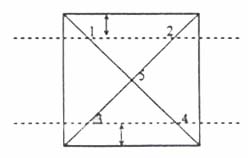
If use glass sample to test, it needs to take 300mm x 300mm under the same craft condition producing, before test, glass sample need to be put into room temperature above 4 hours, then draw two parallels which parallel two opposite edges and distance with each side of edge 70mm, these two parallel will cross diagonal to form four points, together with point of intersection for two diagonals it will have five measure point. Please see Figure 7.

If use finished product to test, the measure point need to be discussed by two parties.

Figure 7

Chemically Strengthened Glass Surface Stress Measure Point

Figure-7-Of-Chemical-Strengthen-Glass-Testing-Standard.jpg

TESTING DEVICE

Adopting GB/T 18144 prescribed surface stress meter.

TESTING PROCEDURE

Test samples non-tin surface stress as per GB/T 18144 prescribed.

Each piece of sample surface stress value should be five measure point surface stress average, and keep integer.

Take three pieces of glass samples to test, when these three pieces of glass are all accord with standard means this characteristic are qualified, if it has two or above two piece of glass are not accord with standard, it is unqualified. If it has one piece of glass is not qualified then need to fetch three new pieces of samples to test again, until three pieces of glass are all qualified.

Compressive Stress Layer Thickness

SAMPLE

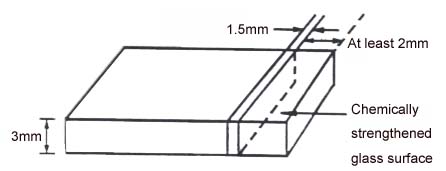
Using 3mm thick glass that produced by the same process with finished products and size is 25x13mm at least, cut the end vertically which is extending to inner 2mm at least, then cut 1.5mm again in the same direction, at this time polish two cut surface, it should be keep two cut surface in parallel as polishing, please see Figure 8.

Figure 8

Sample Prepared Schematic Drawing

Figure-6_Of-Chemical-Strengthen-Glass-Testing-Standard.jpg

TESTING DEVICE

The lowest magnification of objective is 100 times of polarization microscope, +45o polarizer, and measuring micro ruler which measure precision is 1 μm and repetitive measure different is less than 5μm.

TESTING PROCEDURE

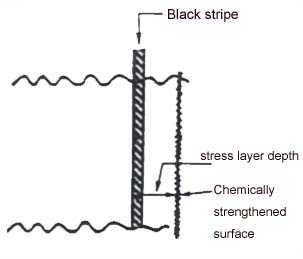
Put each of cut surface upturned samples into polarization microscope visual field, observe interference fringe (Showing in Figure 9), and measure the distance from center of this fringe to glass surface which is the nearest to sample.

Figure 9

Measure Stress Layer Depth

Figure-9-Of-Chemical-Strengthen-Glass-Testing-Standard.jpg

Shock Resistant

SAMPLE

Take 300x300mm square glass as sample

TESTING DEVICE

Using 227g steel ball and impact-testing device according with GB/T 5137.1 item 5.2 prescribed.

TESTING PROCEDURE

Testing as per item 5.4 of GB/T 5137, each sample has been impacted only one time.

Take six samples to test, when less than 1 piece of glass broken, testing is qualified; if more than two pieces of samples broken, testing is unqualified; if just two piece of glass broken, then need to fetch new six glass samples for testing, until these new six samples do not break is qualified.

Inspection Classification

Inspection sort: delivery inspection and general inspection

DELIVERY INSPECTION

Inspection item: size, thickness, appearance quality, degree of curve and surface stress.

GENERAL INSPECTION

Inspection item is this standard prescribed all technical requested, if it has any matter same as one of below lists, it should be carry on general inspection

  • When new product or old product transferred to other factory to produce, it needs to be judge trial-produce product.
  • After official production, if configuration, material and process change a lot, it will affect product characteristic.
  • When production is already for 1 years
  • When stop production more than half years, then come back to produce
  • When the results checked by deliver inspection is different with checked by general inspection.
  • Quality supervision department put forward to carry on general inspection

Made In One Group & Sample

MADE IN ONE GROUP

Chemically strengthened glass makeup in one group, it should have in the same material and same process.

SAMPLE

Thickness, size, appearance quality, degree of curve and surface stress should be sampled by random according with Table 11.

For product technical requirement, if use finished product to test, it should be draw out by random from this batch produce according with inspection item required amount; if use samples to test, it should be adopted glass sample which is produced by the same process with finished product, also uses the same material and has same thickness with finished products.

Determinant Rule

  • If size, thickness, appearance quality, degree of curve and surface stress's number of unqualified is equal or more than number of unqualified determinant in Table 11, then this batch of product size, thickness, appearance quality, degree of curve and surface stress is unqualified.
  • The other performance also accord with relevant rule, otherwise, this item performance is unqualified.

If above kinds of items, among one of items is unqualified, then this batch product is unqualified.

Table 11

Sampling List

Unit (piece)

Range Of Batch Nr. Of Sampling Nr. Of Qualified Determinant Nr. Of Unqualified Determinant
2~8 2 0 1
9~15 3 0 1
16~25 5 1 2
26~50 8 2 3
51~90 13 3 4
91~150 20 5 6
151~280 32 7 8
281~500 50 10 11

Sign, Packing, Storage & Transportation

SIGN

In each packing box it should be mark product sort, thickness, company name and brand, standard code and product sign, still give clear indication of "lightly put, moisture resistance, upwards".

PACKAGE

Product should be packed by wooden case or other package box, glass should be vertically put in box, in each piece of glass it has plastic cloth or paper packed, between glass and package case it should use light and soft material to fill the space, in this way it will avoid scratching

STORAGE

Product should be put vertically in dry room.

TRANSPORTATION

In transportation, do not put wooden case flat, packing length should be the same as vehicle moving direction, have rainproof measure in transportation.

Testing Condition

  • Room temperature is 23℃ + 5℃
  • Room humidity is 40% ~ 70%

In order to avoid heat stress producing, in testing process surroundings temperature fluctuation is not more than 1oC.

Sample

Fetch 12 piece of glass to test. Length and width of each sample are 1100mm + 5mm and 360mm + 5mm respectively. When preparing sample, incision cut should be kept in the same surface with sample.

Before testing in 24 hours do not process the sample, if sample surface sticks protective film, it needs to be taken off and keep 24 hours before testing. It should be put more than 4 hours as per mentioned above.

Testing Device

Using material tester to test, tester can load continuously and evenly samples, still minimize shock that crated by loading. Tester should have load measure device, and in its range the tolerance should be less than +2%. Support roller and load roller's diameter are 50mm, length is 365mm and up. All support roller and load roller can turn around each of roll mandrel.

Testing Procedure

MEASURE SAMPLE'S WIDTH AND THICKNESS

Measure width three times respectively, use its arithmetic average and keep precision at 1mm.

When measuring thickness, in order to avoid breaking surface, it should be measure at the both end of glass (At least measure the section beyond of load roller), respectively measure four points, use its arithmetic average and keep precision at 0.01mm. Another way, we also can measure the broken glass thickness after tested, fetch four fragments from each of sample to measure thickness, and its arithmetic average and keep precision at 0.01mm.

SAMPLE

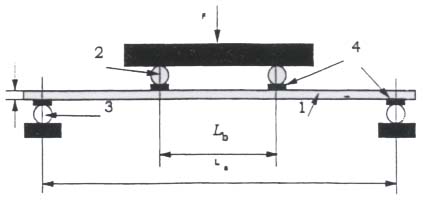
Put cut surface upturned, in order to find out origin of rupture and prevent fragment dispersing, we can put protective film on the surface of sample. Put sample as per Figure A1, rubber strip thickness is 3mm, hardness is 40 IRHD +10 IRHD.

Figure A.1

Four Points Bending Strength Testing

Figure-A1-Of-Chemical-Strengthen-Glass-Testing-Standard.jpg
  • 1 - Sample
  • 2 - Load roller
  • 3 - Support roller
  • 4 - Rubber strip
  • Lb - Equal to 200mm+1mm;
  • Ls - Equal to 1000mm+2mm

LOAD

Tester loads sample as per bending stress 2 Mpa/s + 0.4Mpa/s increasing speed until sample broke, then record the max. loading of each sample broken, the time from start-up load to sample broken (Keep precision at 1s) and if origin of rupture is between load roller.

DATA PROCESSING

Origin of rupture should be between load roller, otherwise, use new sample to test again to assure each group number unchanged. Calculate bending strength as per A.1

Figure-A1-Equation-Of-Chemical-Strengthen-Glass-Testing-Standard.jpg
  • бbG - Bending strength (Mpa)
  • Fmax - The max loading when sample broken (N)
  • Ls - Distance between two centers of support roller shaft (mm)
  • Lb - Distance between two centers of load roller shaft (mm)
  • B - Sample width (mm)
  • h - Sample thickness (mm)
  • бbg - Bending strength crated by self weigh, or get from calculating (A.2) (Mpa)
  • бbg = 3ρgLs2 --------- (A. 2)
    4h
  • Ρ - Sample's density, for normal soda-lime-silica glass ρ=2.5x10³ kg/m3;
  • g - Unit scaling factor, 9.8 N/kg;
  • Ls - Distance between two centers of support roller shaft (mm)
  • h - Sample thickness (mm)

Appendix B(Chemically Strengthening Glass Relevant Specification)

  • Chemically strengthened glass is reinforcing glass got through ion replacement. Ion replacement procedure can effectively improve glass mechanical strength, and especially suit for reinforcing ultrathin, small size or complex shape glass product. Glass through ion replacement processing do not produce obvious optics distortion.
  • Chemically strengthened glass strength has relative with glass component, surface and edge state, ion replacement procedure processing and usage surroundings etc factor.
  • Though chemically strengthened glass surface compressive stress is very high, the center glass tensile stress which is opposite with surface compressive stress is very low, so chemically strengthened glass do not exist in spontaneous explosion phenomenon.
  • Chemically strengthened glass should be keep a certain replacement layer depth, The more time replacement need, the more depth replacement layer will be exist in, but surface stress will reach crest, then reduce gradually.
  • If single normal anneal glass through ion replacement make chemically strengthened glass is not safety glass, its fragment state after ruptured is similar with broken state of normal anneal glass. When it use in some place that will affect personal safety, it need to process more, such as to make laminated glass.
  • Chemically strengthened glass can be cut, but new cut edge will reduce intensity, so to give producer suggestion, it is better to finish all of pre-process procedure before Chemically strengthen.
  • Ion replacement procedure changed glass surface character, therefore, chemically strengthened glass subsequent processing (eg. laminated glass or coated glass) procedure is different with processing non- chemically strengthened glass.